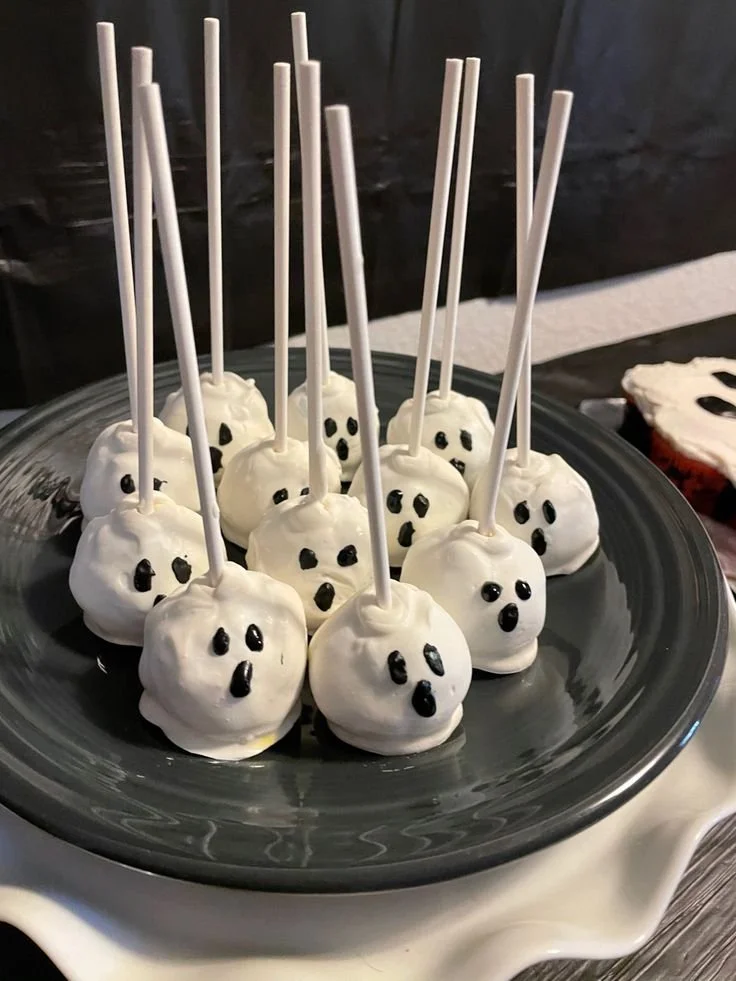
Cake pops are a fun and delicious treat that everyone loves, especially when they’re inspired by the spooky season. These Halloween Cake Pops are not only simple to make but also a delightful addition to any Halloween party or gathering. With their cute ghostly faces, they bring a festive flair that kids and adults alike can enjoy. Let’s dive into how to make these easy and charming treats!
Why You’ll Love Halloween Cake Pops
- Easy to Make: With just a few ingredients and straightforward steps, these cake pops come together quickly, making them a perfect project for beginner bakers.
- Customizable: You can switch up the flavor of the cake mix and frosting or decorate them differently, allowing for creative expression based on your personal preferences.
- Fun for All Ages: Kids love helping to roll the cake balls and decorate them, making these cake pops a perfect family activity.
- Make Ahead: These treats can be prepared in advance and stored, saving time on the day of your celebration.
- Great for Parties: With their eye-catching look and poppable size, cake pops are ideal for parties, potlucks, or Halloween gatherings.
Recipe Overview
- Prep Time: 20 minutes
- Cook Time: 30 minutes (including cooling)
- Total Time: 1 hour
- Servings: About 12 cake pops
- Difficulty Level: Easy
Ingredients You’ll Need for Halloween Cake Pops
- 1 box cake mix (any flavor): Chocolate, vanilla, or spice cake work wonderfully here.
- 1 cup frosting: Store-bought or homemade; choose your favorite flavor to complement the cake.
- White candy coating or white chocolate: This will form the outer layer of the cake pops.
- Chocolate chips or candy eyes: Use these for decorating the ghost faces.
- Lollipop sticks: Essential for turning cake bites into adorable cake pops.

here
How to Make Halloween Cake Pops
- Bake the Cake: Prepare the cake mix according to the package instructions. Once baked, let it cool completely.
- Crumble the Cake: In a large bowl, crumble the cooled cake into fine pieces.
- Mix with Frosting: Add the frosting to the crumbled cake and mix until fully combined. The mixture should be moist but hold its shape when you form a ball.
- Form the Balls: Using your hands, scoop out small portions of the mixture and roll them into balls, about 1 inch in diameter.
- Insert Lollipop Sticks: Push a lollipop stick into the center of each ball, ensuring it goes in halfway. Place the balls onto a baking sheet lined with parchment paper and freeze for about 30 minutes.
- Melt the Coating: In a microwave-safe bowl, melt the white candy coating or white chocolate, stirring every 30 seconds until smooth.
- Coat the Cake Pops: Dip each chilled cake pop into the melted coating, turning it to ensure it’s fully covered. Allow any excess to drip off.
- Decorate: Before the coating sets, press chocolate chips or candy eyes onto each cake pop to create ghost faces.
- Set Completely: Let the cake pops sit at room temperature or in the refrigerator until the coating hardens, then they are ready to serve!
Tips for Success
- Make sure the cake is completely cool before crumbling; this ensures the mixture holds together well.
- If the mixture is too dry, add more frosting, a little at a time, until it reaches a moldable consistency.
- When dipping the cake pops, gently swirl them to remove excess coating for a smoother finish.
- Keep the pops on parchment paper until the coating hardens to avoid them sticking to any surface.
- Experiment with different decorations for various themes or occasions.
Easy Variations
- Chocolate Cake Pops: Use a chocolate cake mix and pair it with chocolate frosting for a rich chocolate flavor.
- Red Velvet Variants: Substitute red velvet cake mix and cream cheese frosting for a festive twist.
- Dipped in Colored Chocolate: For a pop of color, try using colored candy melts for the coating instead of white.
- Add Sprinkles: Before the coating hardens, sprinkle colorful Halloween-themed sprinkles on top for extra fun.
- Monster Faces: Instead of ghosts, use colorful candy and icing to create fun monster faces.
What to Serve with Cake Pops
- Hot Chocolate: The warm, rich beverage complements the sweetness of the cake pops.
- Apple Cider: This classic fall drink pairs wonderfully with the holiday theme.
- Cupcakes and Brownies: Serve alongside other sweet treats for a dessert platter.
- Fruit Platters: Fresh fruit offers a refreshing contrast to the sweetness of the cake pops.
- Cheesecake Bites: These provide a hearty, indulgent option on a dessert table.
Storage and Reheating
- Refrigerator Storage: Store cake pops in an airtight container in the refrigerator for up to a week.
- Freezer Storage: Cake pops can be frozen for up to three months. To freeze, place them in a single layer on a baking sheet until firm, then transfer them to a freezer-safe container.
- Reheating: Cake pops are best enjoyed at room temperature. To refresh them after freezing, let them sit out for about 30 minutes before serving.
- Meal Prep Note: These cake pops can be made a few days in advance, making them perfect for busy schedules.
Common Mistakes to Avoid
- Not Cooling the Cake: Failing to let the cake cool completely can result in a soggy mixture.
- Too Much Frosting: Adding too much frosting can make the mixture too wet, leading to difficulty in forming balls.
- Skipping the Freezing Step: Freezing the cake pops is crucial for preventing collapsing during the coating process.
- Overheating Chocolate: When melting chocolate, be careful not to overheat, as it can seize up or become grainy.
- Not Decorating Quickly: If the coating sets too quickly, decorations may not stick, so work fast after coating.
Halloween Cake Pops: Background & Cultural Inspiration
Cake pops originated in the United States in the early 2000s and quickly became a popular treat in bakeries and at social gatherings. These bite-sized delights offer a playful twist on traditional cake, allowing for creative designs and flavors. By combining the fun of lollipops with the comforting texture of cake, they bring a unique treat to various occasions, especially during holidays like Halloween. The ghost theme not only caters to the festive spirit of October but also allows for interactive baking fun, making them a favorite among families.
Frequently Asked Questions
Can I use any flavor of cake mix?
Yes, feel free to use any flavor that you enjoy! Chocolate, vanilla, or even lemon can be delightful options.
How long can I store cake pops?
Cake pops can be kept in the refrigerator for up to a week or frozen for up to three months.
Can I make these cake pops dairy-free?
Absolutely! Use a dairy-free cake mix and frosting, and opt for dairy-free chocolate for coating.
How do I make sure my cake pops don’t fall off the stick?
Freezing the cake pops for at least 30 minutes helps them hold their shape and gives the coating a solid base.
Can I use regular chocolate instead of candy coating?
Yes, but keep in mind that normal chocolate may need tempering to ensure it properly coats and sets on the cake pops.
Final Thoughts
These Halloween Cake Pops are a delightful treat that adds a whimsical element to any celebration. With their easy preparation and customization options, they make for a fun family activity and a guaranteed crowd-pleaser. Whether you’re serving them at a party or enjoying them as a festive snack, these little bites of joy are definitely worth trying. Grab your ingredients and start creating these charming cake pops today!