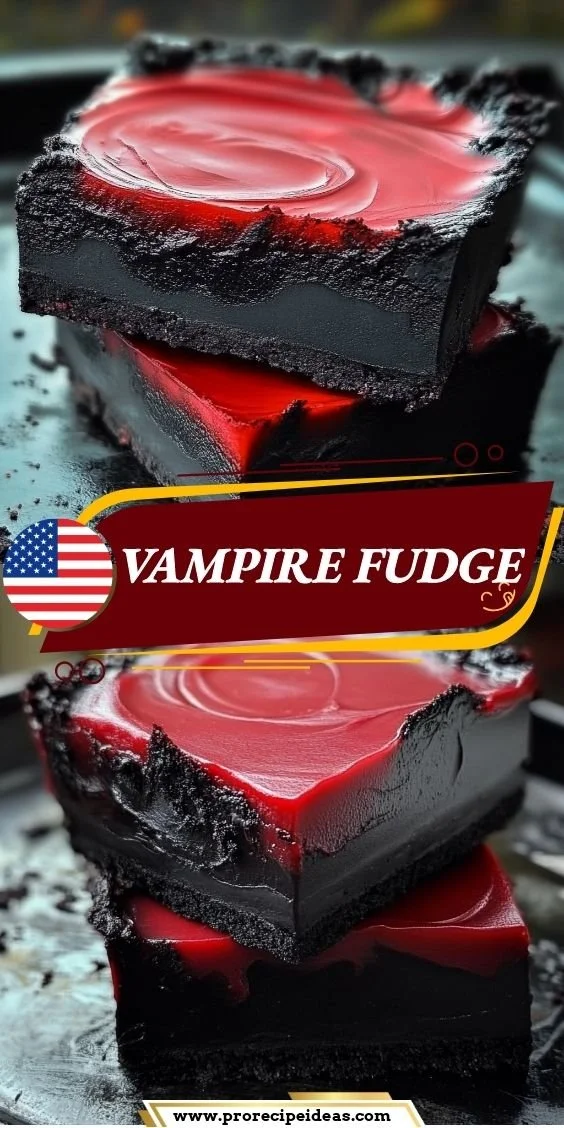
Creating Vampire Fudge is a delightful way to celebrate the spooky season or to add a touch of playfulness to your dessert table. This easy recipe produces a visually striking treat that’s perfect for parties or just to satisfy your sweet tooth. With its layered colors and rich flavors, Vampire Fudge is bound to be a hit with both kids and adults alike.
Why You’ll Love Vampire Fudge
- Visually Stunning: The bold red and black layers create a striking effect, making this fudge a showstopper at any gathering.
- Easy to Make: With simple steps and minimal equipment, even novice cooks can whip up this treat without stress.
- Fun for All Ages: Ideal for Halloween parties, kids can help with mixing and decorating, making it a fun family activity.
- Customizable Flavors: You can easily adjust color and flavor; add your favorite extracts or toppings for a unique twist.
- No-Bake Recipe: There’s no oven required, making it perfect for warmer days or last-minute dessert preparations.
Recipe Overview
- Prep Time: 20 minutes
- Cook Time: 10 minutes
- Total Time: 1 hour (includes chilling)
- Servings: 16 pieces
- Difficulty Level: Easy
Ingredients You’ll Need for Vampire Fudge
- Chocolate Layers:
- 2 cups semi-sweet chocolate chips
- 1 can (14 ounces) sweetened condensed milk
- 1 teaspoon vanilla extract
- 1/4 teaspoon salt
- Colored Layers:
- 1 cup white chocolate chips
- Red food coloring (to taste)
- Black food coloring (to taste)
- Decoration:
- Edible glitter (optional)
For the best texture, use high-quality chocolate chips. If you’re looking for a slightly different flavor, try swapping the semi-sweet chocolate for dark chocolate.

How to Make Vampire Fudge
1. Prepare the Baking Dish
Line an 8×8-inch baking dish with parchment paper, allowing some overhang for easy removal later.
2. Melt Semi-Sweet Chocolate
In a medium saucepan, combine the semi-sweet chocolate chips and half of the sweetened condensed milk. Stir over low heat until melted and smooth.
3. Add Flavor
Stir in half of the vanilla extract and salt. Mix until well combined, then pour the chocolate mixture into the prepared baking dish. Spread it evenly and smooth the top.
4. Cool the First Layer
Place the dish in the refrigerator for about 15 minutes to set slightly.
5. Melt White Chocolate
In another saucepan, combine the white chocolate chips and the remaining sweetened condensed milk. Stir over low heat until melted and smooth.
6. Color the White Chocolate
Add red food coloring to the white chocolate mixture until you achieve your desired shade of red. Stir well.
7. Spread Red Layer
Pour the red mixture over the semi-sweet chocolate layer, spreading it evenly. Place the dish back in the refrigerator for another 15 minutes.
8. Prepare Black Layer
Repeat the melting process with white chocolate chips and the remaining sweetened condensed milk. This time, add black food coloring until you achieve a dark hue.
9. Pour Black Layer
Carefully pour the black mixture over the red layer, smoothing it out as needed. Make sure it’s evenly distributed.
10. Final Touch
If desired, sprinkle edible glitter on top for an extra spooky effect.
11. Chill Completely
Place the fudge in the refrigerator for at least 30 minutes to set completely.
12. Cut and Serve
Once set, lift the fudge out of the pan using the parchment overhang. Cut into squares and enjoy!
Tips for Success
- Be Patient: Allow each layer to set before adding the next to keep the colors distinct.
- Watch the Heat: Melt the chocolate over low heat to avoid burning.
- Add Color Gradually: Start with a few drops of food coloring; you can always add more.
- Texture Check: The fudge should be firm but soft enough to cut easily; avoid overcooking.
- Chill Well: Ensure the fudge is thoroughly chilled before slicing for clean edges.
Easy Variations
- Peanut Butter Twist: Incorporate creamy peanut butter into the semi-sweet chocolate layer for added richness.
- Nutty Delight: Mix in chopped nuts, like pecans or almonds, for a crunchy texture.
- Minty Fresh: Add a few drops of peppermint extract to the white chocolate layer for a festive flavor.
- Dairy-Free Option: Use dairy-free chocolate chips and sweetened condensed coconut milk for a vegan version.
- Double Layer Red: Use red and white layers exclusively for a Halloween-themed treat without the black layer.
What to Serve with Vampire Fudge
- Hot Cocoa: A warm drink enhances the sweet, rich flavors of the fudge.
- Ice Cream: Pair with vanilla or chocolate ice cream for a delightful contrast.
- Fruit Salad: Fresh fruits can balance the sweetness, providing a refreshing side.
- Coffee: Complement the rich chocolate flavors with a cup of your favorite brew.
- Spiced Cookies: Serve with gingerbread or snickerdoodles for added seasonal flair.
Storage and Reheating
- Refrigerator: Store leftovers in an airtight container for up to one week.
- Freezer: For longer storage, freeze individual pieces between layers of parchment paper. They can last up to two months.
- Reheating: If you prefer your fudge warm, microwave it for a few seconds, but be careful not to overdo it.
- Texture Preservation: Keep it cool to maintain the desired fudge-like texture.
Common Mistakes to Avoid
- Skipping Chill Time: Not chilling between layers can cause them to mix, ruining the visual effect.
- Too Much Heat: Cooking chocolate too quickly can cause it to seize up, making it grainy.
- Incorrect Ratios: Measure ingredients accurately to prevent a grainy texture in your fudge.
- Not Using Parchment: Skipping parchment paper can make it difficult to remove the fudge from the pan.
- Overmixing: Once melted, stir just until everything is combined to avoid air bubbles.
Vampire Fudge: Background & Cultural Inspiration
Vampire Fudge captures the spirit of Halloween, where playful, spooky themes abound. Originally inspired by the aesthetic of Halloween treats, this recipe combines layers of chocolate to create a dessert that not only tastes great but also adds an element of fun. Layered desserts have a long history in various cultures, often intended for celebrations. Fudge itself has roots in the 19th century, originating in the United States, and has evolved into countless variations, making it a beloved treat enjoyed by many.
Frequently Asked Questions
Can I use other types of chocolate?
Yes, you can substitute semi-sweet chocolate with dark or milk chocolate, depending on your preference.
How do I store Vampire Fudge?
Store in an airtight container in the fridge for up to one week, or freeze it for up to two months.
Can I make this fudge ahead of time?
Absolutely! This fudge can be made several days in advance and stored until you’re ready to serve.
What if I don’t have sweetened condensed milk?
You can make a homemade version using milk and sugar or use evaporated milk with a bit of sugar added; it won’t be as sweet but will work fine.
Is Vampire Fudge gluten-free?
Yes, all the ingredients in this recipe are naturally gluten-free, making it suitable for those with gluten sensitivities.
Final Thoughts
Vampire Fudge is a fun, eye-catching treat that’s easy to make and delightful in taste. Its striking appearance and rich flavors make it perfect for any occasion, especially around Halloween. Whether you’re celebrating with family or looking to impress guests, this fudge will certainly add a festive touch. Try making it today and enjoy the creative process of crafting this spooky dessert!