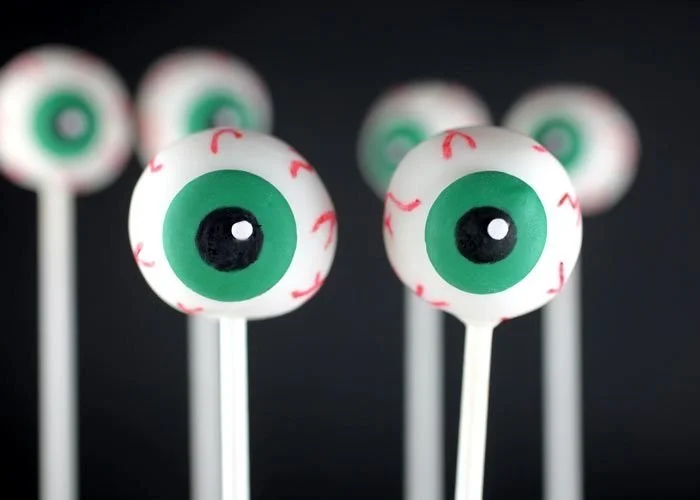
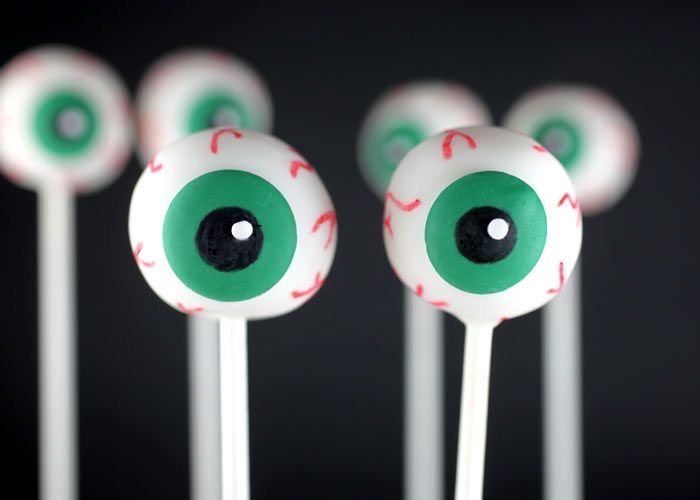
Cake pops are a delightful treat that brings a fun twist to traditional cake, and these Eye Ball Cake Pops are perfect for any festive occasion. They are not only whimsical and appealing but also surprisingly easy to make. If you’re looking to impress your friends and family with a unique dessert idea, these cake pops are definitely worth the effort!
Why You’ll Love Eye Ball Cake Pops
- Fun Presentation: The playful eyeball design makes these cake pops a hit at parties, especially around Halloween or themed gatherings.
- Simple to Make: With just a few steps involved, even beginner bakers can successfully whip up these treats without feeling overwhelmed.
- Customizable: You can easily personalize the flavor and decoration based on your preferences or the occasion.
- Portable Treat: Cake pops are easy to transport and can be enjoyed on the go, making them perfect for gatherings and parties.
- Kid-Friendly Activity: Making these cake pops can be a fun kitchen project with kids, allowing them to get creative with decorating.
Recipe Overview
- Prep Time: 30 minutes
- Cook Time: 25 minutes
- Total Time: 55 minutes (plus cooling and freezing time)
- Servings: 12 cake pops
- Difficulty Level: Easy
Ingredients You’ll Need for Eye Ball Cake Pops
-
For the Cake Base:
- 1 box chocolate cake mix
- 3 eggs
- 1 cup water
- 1/2 cup vegetable oil
-
For Decoration:
- 1 cup frosting (store-bought or homemade)
- 1 lb white chocolate or candy melts
- Black frosting or chocolate chips for decoration
- Lollipop sticks
The cake mix provides an easy base, while the frosting keeps the cake pops moist. You can substitute the chocolate cake mix with any flavor you prefer, such as vanilla or red velvet, for a different taste.
here
How to Make Eye Ball Cake Pops
- Bake the Cake: Preheat your oven and follow the package instructions to bake the chocolate cake. Allow it to cool completely on a wire rack.
- Crumble the Cake: Once the cake has cooled, crumble it into a large bowl. This should be done until there are no large chunks left.
- Combine with Frosting: Add the frosting to the crumbled cake. Mix thoroughly until well combined; the mixture should be moist and hold together when formed into balls.
- Form the Balls: Roll the mixture into uniform balls, about 1 inch in diameter, and place them on a baking sheet lined with parchment paper.
- Insert Lollipop Sticks: Gently insert a lollipop stick into the center of each cake ball. Place the baking sheet in the freezer for about 30 minutes to firm up.
- Melt the Coating: Prepare the white chocolate or candy melts according to package instructions, either in the microwave or a double boiler.
- Dip the Cake Pops: Once melted, dip each frozen cake pop into the melted chocolate, making sure they are fully coated. Allow excess chocolate to drip off.
- Decorate: Use black frosting or chocolate chips to create eye designs on each cake pop. You can get creative here—make different expressions or styles!
- Set and Serve: Allow the chocolate coating to harden completely before serving. This may take about 15 minutes at room temperature or you can place them back in the fridge for quicker results.
Tips for Success
- Cooling the Cake: Ensure the cake cools completely before crumbling; this prevents excess moisture and helps the cake pops hold their shape.
- Uniform Size: Try to keep your cake balls uniform in size for even melting and presentation.
- Chilling: Freezing the cake balls before dipping helps maintain their shape during the coating process.
- Quality Chocolate: Use good-quality chocolate or candy melts for the best coating consistency and taste.
- Experiment with Toppings: Feel free to add sprinkles, nuts, or edible glitter on top of the chocolate coating for extra fun!
Easy Variations
- Flavor Swaps: Use vanilla or red velvet cake mix instead of chocolate for a different flavor profile.
- Colorful Coatings: Dye white chocolate with food coloring to create vibrant coatings for more festive designs.
- Filling Add-ins: Mix in crushed cookies or candy crumbles into the cake mixture for added texture.
- Pumpkin Spice Pop: For a seasonal twist, use pumpkin cake mix and cream cheese frosting, coating them in white chocolate and adding candy corn decoration.
- Dipped in Sprinkles: After dipping in chocolate, roll the cake pops in sprinkles before the coating sets.
What to Serve with Eye Ball Cake Pops
- Milk: A classic pairing, milk complements the sweetness of the cake pops perfectly.
- Coffee: The richness of coffee balances out the sweetness and is a great adult beverage option.
- Ice Cream: Serve with a scoop of vanilla or chocolate ice cream for a delightful dessert combo.
- Fruit Salad: Lighten up your dessert table with a refreshing fruit salad that contrasts the indulgence of cake pops.
- Themed Drinks: Create fun themed drinks, like a spooky punch for Halloween parties, to elevate your serving experience.
Storage and Reheating
- Refrigerator Storage: Store leftover cake pops in an airtight container in the fridge for up to a week.
- Freezer Storage: You can freeze the uncoated cake balls for up to a month; just allow them to thaw in the fridge before dipping.
- Best Reheating Method: While cake pops are best enjoyed fresh, if you need to reheat, microwave briefly—be careful not to overheat, as this can ruin the chocolate coating.
- Meal Prep Note: These cake pops are great for make-ahead treats; just decorate before serving for the freshest taste.
Common Mistakes to Avoid
- Not Cooling the Cake: Skipping the cooling process can lead to a wet mixture, making it difficult to form balls.
- Overmixing the Frosting: Mixing too vigorously can make the cake pop mixture too wet or gummy.
- Insufficient Freezing: Not freezing the cake pops long enough can result in them falling apart during dipping.
- Skipping Texture Check: Be sure to test the cake ball mixture for consistency before rolling; it should hold together without crumbling.
- Rushing the Coating: Make sure your cake pops are frozen firm before dipping to avoid a messy situation and ensure a smooth coating.
Eye Ball Cake Pops: Background & Cultural Inspiration
The concept of cake pops originated in the United States in the early 2000s, quickly becoming a popular dessert option for parties and celebrations. Their fun, portable size makes them a favored choice for kids’ birthdays and holiday festivities. The playful eyeball design taps into the festive spirit of Halloween, as people enjoy creating spooky-themed treats. Cake pops allow bakers to showcase creativity through decoration, making them not just a treat but an art form!
Frequently Asked Questions
Can I use a different cake flavor?
Absolutely! Feel free to substitute the chocolate cake mix for any flavor you prefer, such as vanilla, red velvet, or lemon.
How long can I store the cake pops in the fridge?
Cake pops can be stored in an airtight container in the refrigerator for about a week while maintaining their taste and texture.
Can I freeze the decorated cake pops?
Yes, you can freeze the decorated cake pops. Just be sure to place them in an airtight container or a freezer bag to prevent freezer burn.
What if my cake pops are too crumbly?
If the mixture is too dry and crumbly, try adding a bit more frosting to help bind it together until it reaches the right consistency.
Can I make these cake pops ahead of time?
Definitely! You can prepare the cake pops a few days in advance, storing them in the fridge or freezer until ready to serve.
Final Thoughts
Eye Ball Cake Pops are not just a feast for the eyes; they are also a treat that’s simple to make and perfect for any occasion. Whether you’re celebrating Halloween, a birthday, or just want something fun and sweet to share, these cake pops will surely be a hit. Try making them for your next gathering, and enjoy the smiles they bring!
PrintEye Ball Cake Pops
Fun and whimsical cake pops shaped like eyeballs, perfect for festive occasions!
- Prep Time: 30 minutes
- Cook Time: 25 minutes
- Total Time: 55 minutes
- Yield: 12 cake pops
- Category: Dessert
- Method: Baking
- Cuisine: American
- Diet: Vegetarian
Ingredients
- 1 box chocolate cake mix
- 3 eggs
- 1 cup water
- 1/2 cup vegetable oil
- 1 cup frosting (store-bought or homemade)
- 1 lb white chocolate or candy melts
- Black frosting or chocolate chips for decoration
- Lollipop sticks
Instructions
- Preheat your oven and follow the package instructions to bake the chocolate cake. Allow it to cool completely on a wire rack.
- Crumble the cake into a large bowl until there are no large chunks left.
- Add the frosting to the crumbled cake and mix thoroughly until well combined.
- Roll the mixture into uniform balls, about 1 inch in diameter, and place them on a baking sheet lined with parchment paper.
- Insert a lollipop stick into the center of each cake ball and freeze for about 30 minutes.
- Melt the white chocolate or candy melts according to package instructions.
- Dip each frozen cake pop into the melted chocolate, ensuring they are fully coated.
- Decorate using black frosting or chocolate chips to create eye designs.
- Allow the chocolate coating to harden completely before serving.
Notes
Ensure the cake cools completely before crumbling to help the cake pops hold their shape.